Step-by-Step Guide to Adding Pop-ups in Elementor
Introduction
In the world of web design, one thing is for certain – the power of pop-ups should never be underestimated. These ingenious little boxes have the ability to captivate your audience, capture leads, and boost conversions. If you’re using Elementor, the popular page builder plugin for WordPress, you’re in luck. In this comprehensive guide, we will walk you through the process of adding pop-ups in Elementor, allowing you to take your website to the next level.
Understanding the Importance of Pop-ups
Pop-ups have become an essential tool for modern-day marketers and website owners. They grab attention, deliver targeted messages, and compel visitors to take action. However, it’s crucial to strike the right balance between attracting attention and not annoying your users. With Elementor, you can create elegant and user-friendly pop-ups that enhance the user experience and improve conversion rates.
Step-by-Step Guide to Adding Pop-ups in Elementor
Step 1: Install and Activate Elementor
To get started, ensure that you have Elementor installed and activated on your WordPress site. Elementor provides a seamless drag-and-drop interface that makes creating pop-ups a breeze.
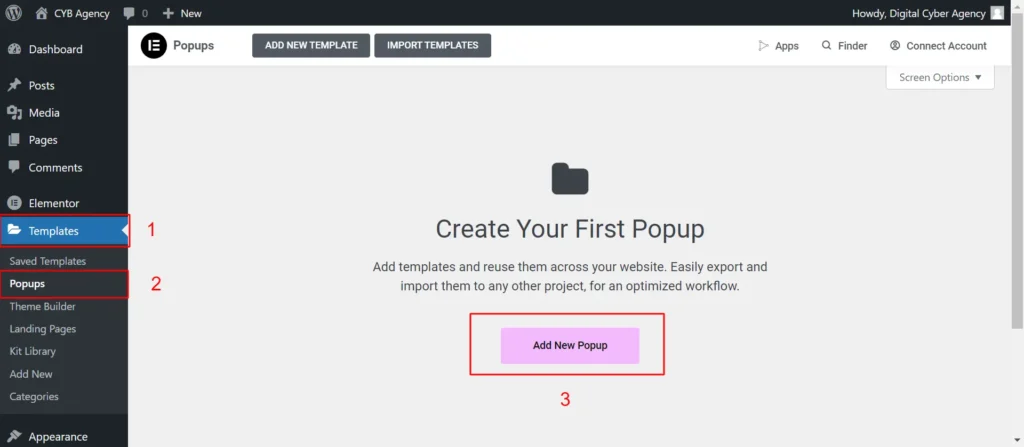
Step 2: Create a New Pop-up
Once Elementor is activated, navigate to your WordPress dashboard and click on “Templates” under the Elementor tab. From there, click on “Popups” and then “Add New” to create a new pop-up template.
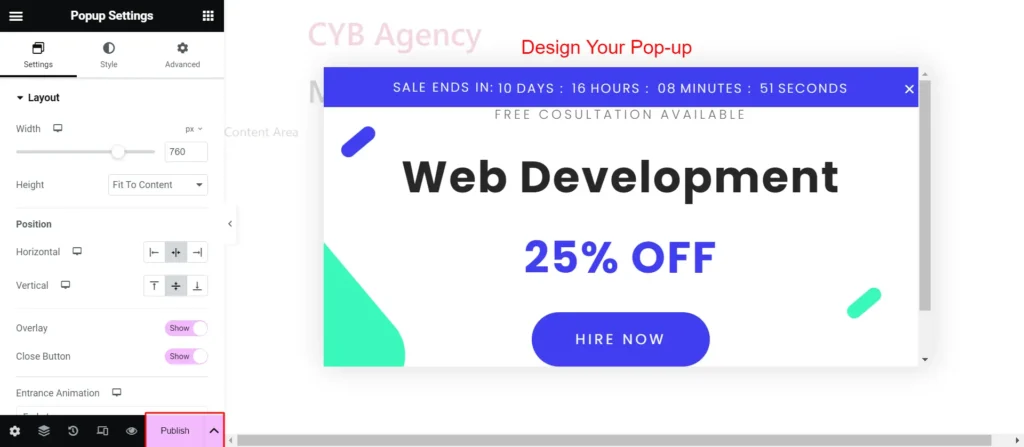
Step 3: Design Your Pop-up
Elementor offers a plethora of customization options to ensure your pop-up aligns with your branding and captures attention. Use the drag-and-drop editor to add elements, such as headlines, images, buttons, forms, or videos, and customize them according to your preferences.
Step 4: Set the Display Conditions
To make your pop-up appear at the right time and to the right audience, you can set display conditions. Choose whether to show the pop-up on specific pages, posts, categories, or target it only to certain users. This enables you to create personalized and relevant pop-ups for different segments of your audience. Once you’re satisfied with the design and display settings, save your pop-up template and publish it.

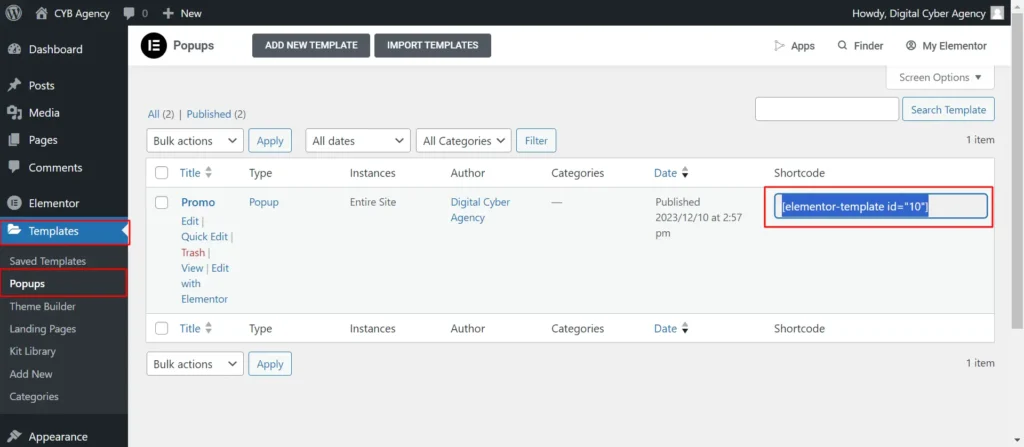
Step 5: Display Your Pop-up
Elementor allows you to embed your pop-up directly into specific pages, posts, or widgets. Simply copy the shortcode provided and paste it where you want your pop-up to appear.
Alternatively, you can trigger a popup from the Elementor page editor. For example, to open a popup on button click, you can use the Dynamic Tags Icon located in front of the Link field. On the next display screen, click on “Popup” and select the relevant popup.

Enhancing the User Experience with Engaging Pop-ups
Now that you know how to create stunning pop-ups in Elementor, it’s essential to consider how you can leverage them effectively. Here are a few tips to enhance the user experience and maximize the impact of your pop-ups:
Summary
Adding pop-ups in Elementor is a straightforward process that can significantly enhance the user experience and boost your website’s performance. By following our step-by-step guide and incorporating best practices, you’ll be able to create visually stunning and engaging pop-ups that capture your audience’s attention and drive conversions. Embrace the power of pop-ups and watch your website thrive!