How to Add a Multi-step Form with the Help of Elementor Page Builder.
Introduction
In today’s digital age, capturing user information is crucial for businesses, but lengthy and cluttered forms can often deter potential customers. To combat this issue, web developers have turned to multi-step forms, which break down the information-gathering process into manageable sections. With the help of the popular Elementor page builder, you can easily create and customize multi-step forms that not only enhance user experience but also improve the overall conversion rate on your website. In this article, we will guide you through the process of adding a multi-step form using Elementor, ensuring a seamless and engaging user interaction.
Understanding the Power of Multi-step Forms
In today’s fast-paced world, users are constantly bombarded with information and have shorter attention spans. Long forms with a multitude of fields can be overwhelming, leading to increased bounce rates. This is where multi-step forms come to the rescue. By dividing complex forms into manageable sections, you provide a more intuitive and enjoyable user experience. With Elementor, you can create stunning multi-step forms that guide users through the submission process, ensuring conversions and reducing form abandonment.
Steps to Create a Multi-step Form in Elementor
Step 1:
Install and activate the Elementor page builder plugin on your WordPress website.
Step 2:
Create a new page or open an existing one with Elementor.
Step 3:
Drag and drop the Form widget onto your page.
Step 4:
Configure your form settings, such as the form name, email notifications, and success message.
Step 5:
Click on the “Fields” tab and add the required form fields.
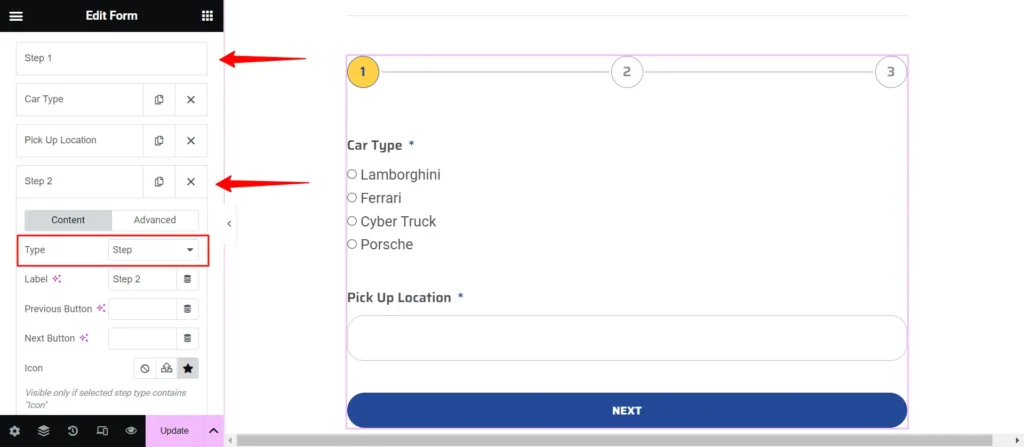
Step 6:
Once you have added all the required form fields, proceed to add a new field item and modify its type to “Step”. This will cause the form to be divided or split at the location where you added the “Step Item”. You have the flexibility to create multiple step fields based on the specific requirements.
Step 7:
Preview and test your multi-step form before publishing it.
Best Practices for Designing an Effective Multi-step Form
To create a highly effective multi-step form with Elementor, it’s important to keep a few best practices in mind:

Summary
Incorporating multi-step forms into your website can greatly improve user experience and increase conversion rates. With Elementor’s user-friendly interface and powerful features, creating interactive and visually appealing multi-step forms has never been easier. By following the step-by-step guide outlined in this article and adhering to best practices, you’ll be able to streamline the information-gathering process and leave a positive impression on your website visitors. Upgrade your forms today and watch your conversions soar!